
 Such a cute idea from the Skip to my Lou Blog I just had to make one myself.
I made one for a gift and it turned out darling. Such a fun idea..
Here’s how to make it. There is also a tutorial on Skip to my Lou.
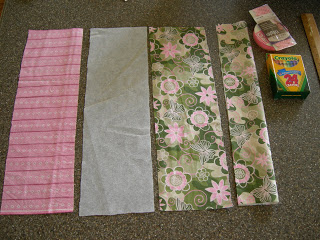
Here’s what you need:
{STEP 1}
*Two Pieces of Fabric Cut 5 x 16 1/2 inches (one for outside one for inside)
*One 6 x 16 1/2 inch piece of fabric for the pocket (fold in half and press lengthwise)
*One piece lightweight fusible interfacing cut to 5 x 16 1/2 inches
*One package ric rac (optional)
*30 inches of Ribbon
*16 crayons
After cutting fabric.

{STEP 2}
Iron the interfacing to the wrong side of the fabric that you want to show on the inside. (5 x 16 1/2 inch piece)
 {STEP 3}
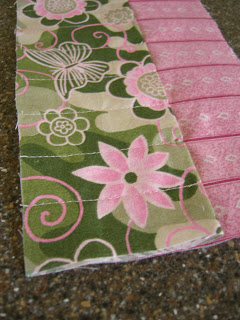
Line up the bottom edges of the folded piece of fabric (the 6 x 16 1/2 inch piece) to the piece with interfacing and pin.
Starting 1 1/4 inches from each edge (left edge then right edge, keeping the 1/4″ for the 1/4″ in seem on each side), then 1″ apart in between. Sew parallel lines across. Starting at the top of the pocket back-stiching to reinforce.
 {STEP 4}
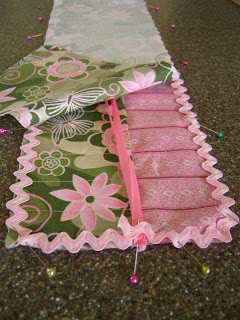
Place ric rac around edges as shown and pin. Fold ribbon in half and pin on the edge. (Ric Rac optional, just pin and blanket stitch the edge if not using ric rac)

 {STEP 5}
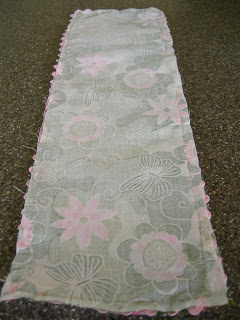
Pin the top piece (remaining 5 x 16 1/2) right sides together then pin and stitch with a 1/4 inch seam. ****BE SURE TO LEAVE A 3″ OPENING FOR TURNING.
 {STEP 6}
Trim all corners, Turn, Press, and Top stitch around the top and make sure that you get all the layers of the opening so that it is stitched closed properly.
And there you have it!!! Cute huh! Feel free to email me if you have any questions.
I LOVE this idea!!!!
Amelia
where do you find the time?
Well, my baby really likes to sleep… for now..
He he. I was just going to ask the same question as Kelly. Lucky for you he sleeps a lot. NICE!
Wow! That is such a great idea. It would make such a wonderful Christmas gift or birthday gift.
This is soooooo cute!