Category Archives: Recipes

Recipe // Decadent Chocolate Valentine Tart

February 6, 2015

Recipe Chocolate Tart Raspberry
Can you believe it’s already Valentine’s Day next week?!
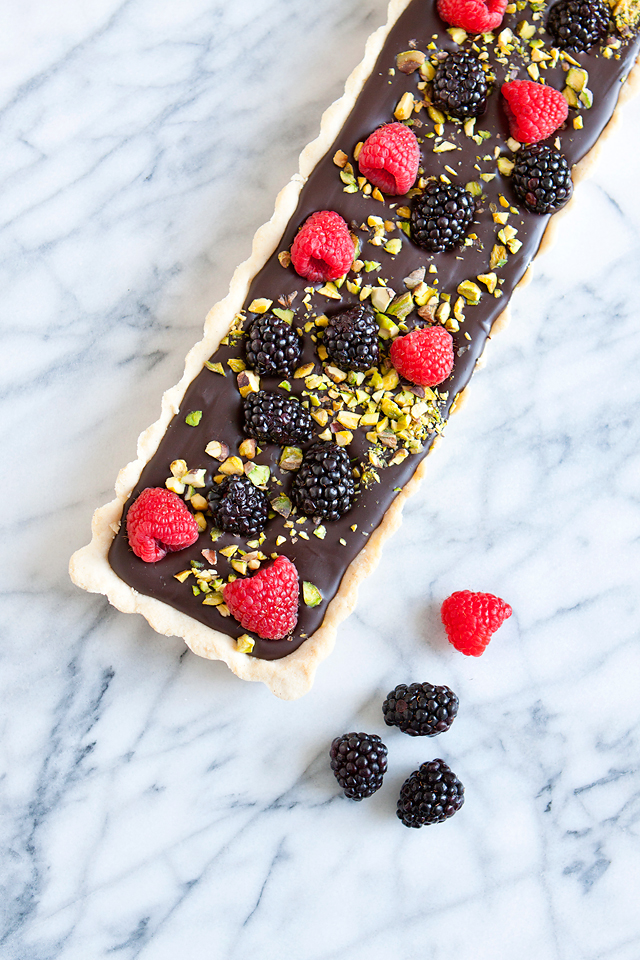
I’m excited to partner with Harmons Grocery to share with you an amazing chocolate tart with berries and pistachio recipe.  It its decadent, and the perfect show stopper to present to your Valentine.  Everyone has different love languages, but I’m sure you’ve guessed that one of mine is making the ones I love something amazing to eat!
Harmons Grocery has an excellent baking isle to bring your desserts to the next level.  My little secret in the pastry crust is a little bit of vanilla bean paste that I swear by, and you can find it in the Harmons baking isle.
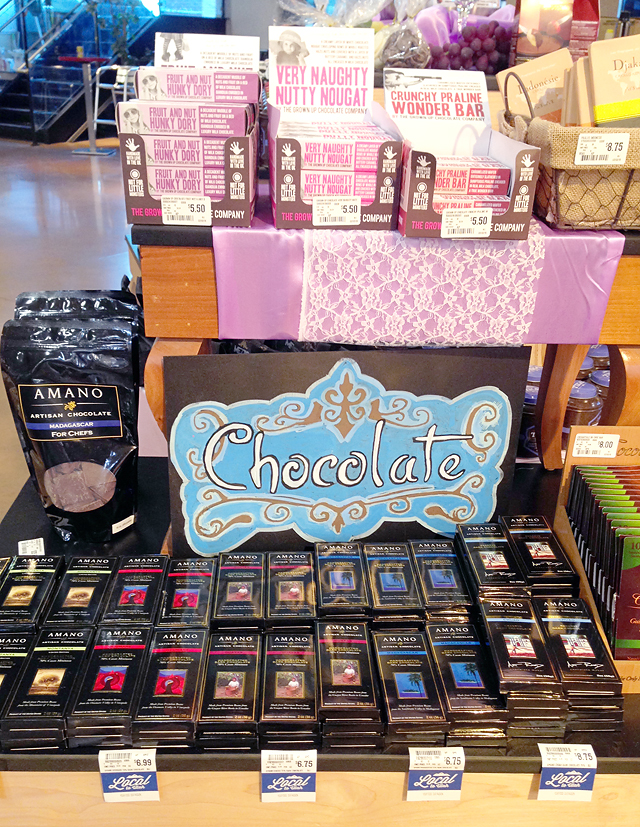
Harmons also has an impressive high quality chocolate section where they sell some of the worlds most amazing chocolate!  Only the best!  And, if you’re not the baking type.  They have an amazing section of homemade tarts and treats for your Valentine, along with an amazing floral department all ready to pick up and deliver to your sweetie!
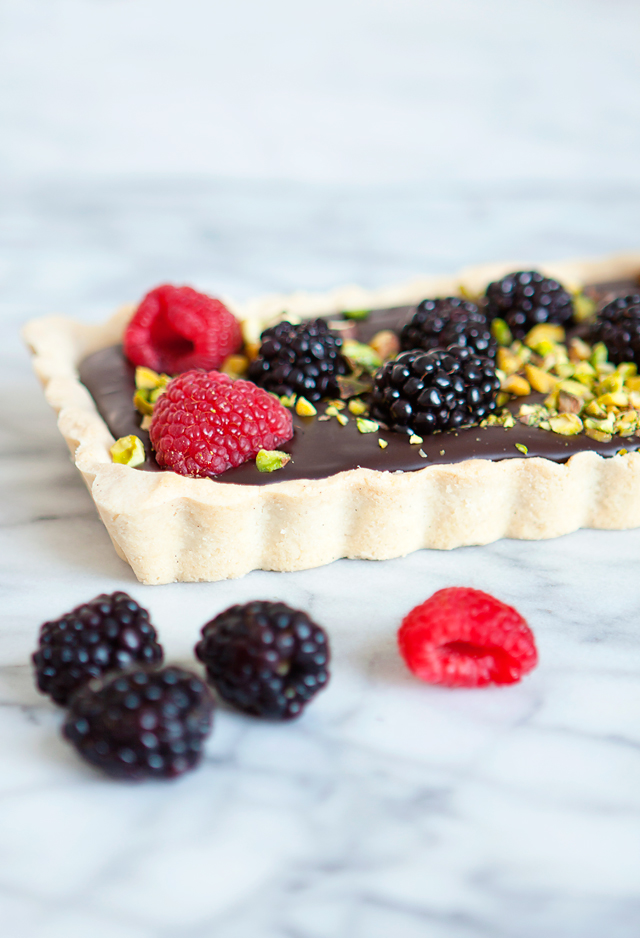
I decided to add a little bit of crunch to the top of my chocolate tart.  Harmons bulk section sells pre-shelled pistachios that I roughly chopped with a knife and sprinkled over the top with some raspberries and blackberries.  You really could use any berries you’d like.  I think berries and chocolate always scream romance, am I right?  Or maybe I’ve been watching too many episodes of Bachelor.  Wink.   Either way.  Can’t go wrong with chocolate and berries!
Decadent Chocolate Tart with Berries and Pistachios
Pastry Crust:
1 1/2 cups all purpose flour
1/3 cups powdered sugar
2 sticks (1 cup) un-salted butter
pinch of sea salt
1 tsp vanilla bean paste
Place the flour, salt, and sugar into a food processor.  Pulse until combined.  Add one tablespoon of butter at a time until the dough starts to form, add vanilla bean paste.  It will be a tad bit dry, but the crust is almost like a shortbread consistency.  Place the dough and form into an un-greased tart mold.  I like to use the rectangular molds with the bottom that pops out.
Cover with tin foiled and bake at 350 degrees for 15-20 minutes or until set.
Ganache:
1 cup heavy cream
6 ounces milk chocolate, chopped
6 ounces good quality dark chocolate, chopped
Place the chopped chocolate in a medium glass bowl. In a small saucepan, heat the heavy cream until hot, just before a simmer and pour over the chopped chocolate.  Allow the hot heavy cream to sit over the chocolate for about one minute, then stir well until incorporated.  It should be fairly sweet with the crust, but if you like a sweeter ganache, you could use all milk chocolate, or add some semi-sweet instead of the dark chocolate.
Poor the ganache into the cooled pastry crust. Allow to cool for about ten minutes in the refrigerator.
Top with washed and completely dried berries, I used raspberries and blackberries, and chopped pistachios.
Allow to set and cool in the fridge for at least three hours before serving.  Store in fridge.
Hope you and your Valentine enjoy it!
{all photos by me}

Holidays // Christmas Morning

January 2, 2015

Christmas Table setting Festive place setting
Merry Christmas, and Happy New Year!!! There is something so magical about Christmas morning when you have little kids.  Everything just become so much more fun to celebrate!
We tried to keep the gifts simple this year, and only get a few things for each of the children.  They were so thrilled to see that Santa Clause had arrived with their gifts!  In our house, Santa doesn’t wrap the gifts he brings them, but mom and dad wrap the gifts we get our children.
I really enjoy putting in some extra touches to make the holidays that much more special for my children!  I think it’s just as fun for me as it is for them to have some extra festive extras.
I have so many party items that I just keep around (cough, hoarder) so, pretty much all of this came from my stash I had!
I love these tiny little gingerbread houses that I found at Tai Pan Trading.  Aren’t they darling!
Caravan Shoppe
Caravan Shoppe has some really cute printables for a great price, that I printed out and put around the table for the kids to color and fill out their favorite traditions, and favorite Christmases to share with each other!
Christmas Table Setting
For Christmas morning breakfast, I make the same thing every year.  I love traditions!  I can’t believe I haven’t shared these recipes with you before!
We make German Pancakes with a homemade vanilla bean syrup, fresh fruit, and a breakfast casserole every Christmas morning!  I like it because I can usually make most of it ahead, then throw it in the oven Christmas morning, and it will bake while we open presents.
German Pancakes
So funny story.  This year the breakfast casserole got a little crispy on top.  It doesn’t normally look this browned.  My husband majorly surprised me this year for Christmas.  He told me my present was out in the garage, and it was too heavy for him to carry in alone.  So, we went out in the garage, and he surprised me with a new car for Christmas!  I was in total shock!! Then we proceeded to jump right in and take a test drive around the neighborhood, forgetting about the breakfast casserole.  Hence the crispy casserole.  Luckily, it still tasted great!
Armelle Blog
Breakfast Casserole
15-20 eggs
32 (2lbs) ounces frozen hashbrowns (thawed)
1/2 lb diced deli ham
1/2 cup diced green onions
4 tablespoons melted butter
2 cups sliced mushrooms
3/4 cup sour cream
1 cup milk
2 cups colby jack cheese, shredded
Preheat oven to 350 degrees.
Mix together eggs, cheese, milk, and sour cream.
Spread out hash browns, ham, green onions, and mushrooms in a 9×13 inch casserole pan.  Pour melted butter over the top.  Then pour egg, cheese and milk mixture over the top.  Bake uncovered for 45 minutes to 1 hour.  Or until eggs are set.  Serve with salsa or hot sauce like tabasco.
German Pancakes
6-7 eggs
1 1/2 cup milk
1 1/2 cups flour
1/8 teaspoon salt
2 tablespoons sugar
2 teaspoons vanilla
3 shakes cinnamon sugar
Place all ingredients in a blender.  Blend well.
Melt 2-3 tablespoons butter.  Place in a 9×13 inch casserole pan, and grease the pan.
Pour batter into pan, and top with cinnamon sugar.
Bake at 425 degrees for 17-20 minutes, or until golden brown.
Vanilla Bean Syrup
1 stick butter
Melt in a medium saucepan over low heat.  When just melted add,
1 cup sugar
1 1/4 cup cream or half and half
Simmer over medium heat.  When it starts to bubble up, turn down to a low simmer and cook for 15 minutes.
When cool, add 1 teaspoon of Vanilla bean paste.  Keep in refrigerator.  Great on waffles and pancakes too!
What are your favorite Christmas traditions?
I hope you all had the best Holiday Season! I’m looking forward to the New Year!  Thanks so much for reading! XOXO!
{all photos by me}

Recipe // Holiday Peppermint Bark

December 23, 2014

 If you are still scrambling for some last minute neighbor gifts, or co-worker treats, I have a great recipe for you!

It is a simple, quick and easy chocolate peppermint bark.

I love to make it and package it up nice and festive in some clear containers.

Peppermint Bark

  • 2 2/3 cups milk chocolate or semisweet chocolate
  • 3 to 5 drops peppermint oil
  • 2 cups good quality white melting chocolate, chopped into coarse pieces
  • ¼ cup chopped candy canes or finely chopped hard peppermint candies

Directions

1) Gently melt the dark chocolate, heating it on very low heat or over hot water until it barely melts.  I use a double boil method with a medium saucepan with simmering water then place a large glass bowl on top with the chocolate inside to melt it.
2) Stir in 2 drops of the the peppermint oil, then spread a thin layer into an 8″ x 12″ oval on parchment paper or foil.
3) Allow the chocolate to set, in the fridge or freezer for about 15-30 minutes. 
4) Melt the white chocolate the same way, and mix it with 2 drops of peppermint oil.
5) Spread the white chocolate over the hardened dark chocolate. (make sure chocolate is well hardened or it will melt with the white chocolate.
6) Sprinkle the rest of the peppermint crunch on top, pressing it in gently.
7) Allow the candy to cool until hardened, then break or cut it into chunks.
8) Store airtight at room temperature for up to a week; freeze for longer storage.
Yield: about 2 dozen pieces.
Enjoy!
{photos by me}