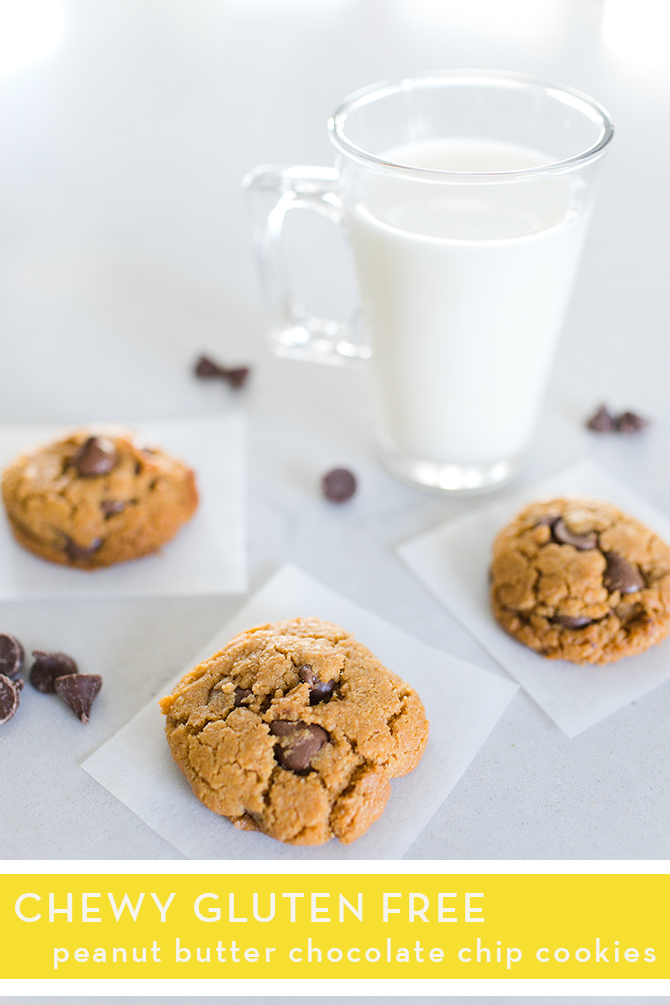
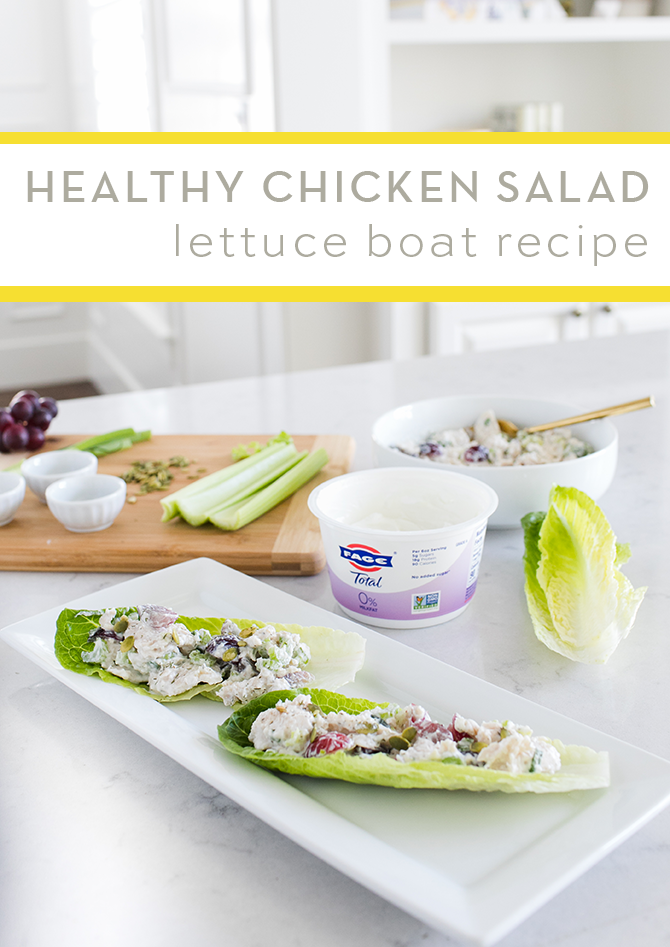
We refer to these "cookies" at our house as breakfast cookies, because they are essentially baked oatmeal with a few other goodies inside. I use the term "cookies" lightly because they aren't exactly like traditional cookies since they are egg-free, gluten-free, dairy-free, and sugar-free. But, for someone who goes off sugar a lot, they sure are a "treat" for me! And, bonus! My kids love them!
Healthy "Cookies"
makes about 12-16 cookies
1 1/2 cups old fashion rolled raw oats
1/4 cup unsweetened small coconut flakes
3 tablespoons natural peanut butter (optional if you want to go nut free)
1 cup applesauce
3-4 very ripe bananas, mashed
1 tablespoon ground flax seeds
pinch of cinnamon
pinch of salt
1 tablespoon dried cherries or cranberries
2 tablespoons raisins or craisins (any dried fruit works)
1 teaspoon vanilla extract
Place all of the ingredients in a medium bowl and mix well.
Use a medium ice cream scoop or make 2 tablespoon round balls and place them on a baking sheet. The cookies do not expand when you bake them, so you can get away with putting them fairly close together.
Bake at 350 for 25-30 minutes.
Enjoy!
Store in fridge for up to 5 days. We love to eat them for breakfast on the go. You can heat them up in the microwave before eating them for 5-10 seconds.
[all photos by me}
Thursday, May 23, 2013
Tuesday, May 21, 2013
cream puffs ...
I used to think cream puffs were one of those really hard pastry items to make, but really they are pretty simple to make!
You just have to start out by making these amazing little pate à chouxs! And fill them with some tasty pastry cream.
I am sharing the full step by step tutorial and cream puff recipe over on my post for Project Wedding today. Be sure to check it out!
[all photos by me, Caroline Armelle Drake]
You just have to start out by making these amazing little pate à chouxs! And fill them with some tasty pastry cream.
I am sharing the full step by step tutorial and cream puff recipe over on my post for Project Wedding today. Be sure to check it out!
[all photos by me, Caroline Armelle Drake]
Labels:
project wedding,
recipes
Thursday, May 16, 2013
family moments at zion ...
My little family was able to spend a little bit of time in St. George Utah last week, and Zion National Park.
I don't know about you, but I can never get over how beautiful the red rocks are in Utah. It really is something!
We love to spend time together as a family, and one of our favorite things to do together is to get out into nature and explore and go on adventures. We decided to take the children on a hike at Zion National Park. We ended up hiking up to the upper Emerald pools.
The children were little troopers, and made it to the top! Well, Tommy rode in the backpack.
Norah surprised us this hike, and was Miss speedy on the way down!
It even rained a little, but it was still amazing to be in such a beautiful place!
It's neat to think this kind of stuff is in our own "back yard" here in Utah!
Have you been to Zion National Park? What's your favorite hike? Mine is Angels Landing, we couldn't do it this time with the kids, but boy is it an amazing view from the top!
It's fun for us to take our kids out and let them explore. I always say that nature is the best babysitter. You just let them free, and they have endless hours of entertainment!
We loved making memories as a family and sharing a fun moment! Be sure to share your moments, and tag them #HDmoment, and Haagen Dazs might share your moment over on their tumblr page.
[all photos by me, taken with my Iphone]
[Disclosure: Haagen Daz sent over product samples and gifts in exchange for me blogging about their "Moment's for Me" campaign. All thoughts and opinions are my own]
I don't know about you, but I can never get over how beautiful the red rocks are in Utah. It really is something!
We love to spend time together as a family, and one of our favorite things to do together is to get out into nature and explore and go on adventures. We decided to take the children on a hike at Zion National Park. We ended up hiking up to the upper Emerald pools.
The children were little troopers, and made it to the top! Well, Tommy rode in the backpack.
It even rained a little, but it was still amazing to be in such a beautiful place!
It's neat to think this kind of stuff is in our own "back yard" here in Utah!
Have you been to Zion National Park? What's your favorite hike? Mine is Angels Landing, we couldn't do it this time with the kids, but boy is it an amazing view from the top!
It's fun for us to take our kids out and let them explore. I always say that nature is the best babysitter. You just let them free, and they have endless hours of entertainment!
We loved making memories as a family and sharing a fun moment! Be sure to share your moments, and tag them #HDmoment, and Haagen Dazs might share your moment over on their tumblr page.
[all photos by me, taken with my Iphone]
[Disclosure: Haagen Daz sent over product samples and gifts in exchange for me blogging about their "Moment's for Me" campaign. All thoughts and opinions are my own]
Labels:
my kiddos
Wednesday, May 15, 2013
DIY giant fringe balloon ...
A fun new trend hopping around is using giant balloons for party or even wedding decor!
We used these giant 36 inch round balloons I found at Zurchers at my daughters 3rd birthday party and they were a hit!
I dressed them up with some fringy crepe paper, and they really added to the event!
I am sharing my full step by step picture tutorial over on my post for Project Wedding today! Be sure to check it out!
[all photos by me, Caroline Armelle Drake]
Labels:
project wedding
Monday, May 6, 2013
DIY: color-blocked painted stick necklaces ...
My children just love to collect things, rocks, sticks, bugs, you name it!
We thought it would be fun to put some of their collections to use, and make some color-blocked painted stick necklaces.
My cute little Norah loved the project, and got down to business painting her stick.
It turned out rather cute! This would also be a fun gift for your children to give for Mother's Day!
Be sure to check out the full step by step tutorial for the necklaces over on Less than Perfect Parents! I am a new contributor over there for kid's craft ideas.
[all photos by me, Caroline Armelle Drake]
Labels:
Contributor,
Crafts,
DIY,
Tutorial
Wednesday, May 1, 2013
ding dong, it's the ice cream man ...
I've had some particularly crazy/rough/busy days the last few months, so it has been nice to have a little gelato "friend" with me when I've been tackling my crazy email inbox. Seems to help a bit!
Sometimes even when you don't have a minute to spare, it's nice to take a brief moment to yourself before you have to get back to the grind.
Be sure to share your #hdmoment, and Haagen Daz might share yours over on the Haagen Daz tumblr page!
[Disclosure: Haagen Daz sent over product samples and gifts in exchange for me blogging about their "Moment's for Me" campaign. All thoughts and opinions are my own]
Labels:
sponsor's
Tuesday, April 30, 2013
DIY tiny hands mothers day flowers ...
I wanted to share a fun little DIY on how to make a pretty crepe paper flower out of tracings of your children's tiny little hands. I thought this would be the perfect idea gift for grandmas, or any special mother in your lives for a special Mother's day gift!
You'll need a few little hands to trace.
And, cut out to form some "petals."
You can see my full tutorial with step by step pictures and instructions over on my post for Hellobee.
[all photos my me, Caroline Drake]
You'll need a few little hands to trace.
And, cut out to form some "petals."
You can see my full tutorial with step by step pictures and instructions over on my post for Hellobee.
[all photos my me, Caroline Drake]
Thursday, April 25, 2013
moments for me ...
If you follow me over on instagram (you can find me @armelle_blog), then you know that I have posted a little bit about working with Haagen Dazs! Well, I am excited to tell you a little more about our partnership!
Haagen Dazs has chosen me, and my family to be brand influencers! We are so excited to work with Haagen Dazs on their "Moments for Me" campaign.
I love the idea of taking a "Moment for Me!" With life being so busy, sometimes we forget to stop and take a moment for ourselves. And, yes, that does include ice cream sometimes, am I right?
Along with some of their amazing new gelato flavors, Haagen Dazs sent us over a fresh perspective box geared toward our family!
I'm not gonna lie, it was like Christmas morning for me when I opened the box, and started going through it's contents! I couldn't help but grin from ear to ear!
Along with several DVDs, and popcorn flavorings perfect for some family movie time, they sent over a romantic spa package for my husband and I, and a gift certificate to Crate and Barrel for me to do some shopping, and more!
I don't know about you, but this week has been especially long, and we've had lots of things going on. I feel like we haven't had a second to sit down and rejuvenate. So, today we decided to take a "moment" to have a little relaxation time! So, we popped some popcorn and put in one of our new DVD's!
The kids really enjoyed the impromptu "party!" as they called it, and I was able take a moment to myself to just sit and relax when things have been so go, go go!
Want to play along? Be sure to share your "Moment's for Me" on your social media (instagram, twitter, Facebook, tumblr), and tag it #HDmoment, and Haagen Dazs will be sharing their favorites on their tumblr page.
Before I go, I also wanted to share with you the easiest way to make popcorn! Two minute paper bag microwave popcorn, is just that! So easy, this is by far our favorite way to make popcorn!
All you need is:
A paper lunch size bag
1/4 cup un-popped popcorn kernels
A piece of tape (washi tape is always cute and practical)
Optional toppings: coconut oil, sea salt, gourmet popcorn flavorings
Step One
Place the 1/4 cup kernels in the bag, and fold the top down two times, and tape it shut.
Step Two
Place the bag in the microwave.
Step Three
Hit the popcorn setting, or cook about 2 minutes or until kernels stop to pop for longer than 5 seconds (every microwave can be different)
Step Four
Open up the bag, and drizzle melted coconut oil in with a little sea salt, and gourmet popcorn topping flavors if you have them, and shake it up! It is also great without anything on it, for a very tasty healthy snack!
My three little monkeys sure enjoyed their popcorn and movie time in mom and dad's bed, and mom enjoyed a few moments of quiet!
Again, be sure to share your "Moment's for Me" on your social media (instagram, twitter, Facebook, tumblr), and tag it #HDmoment, and Haagen Dazs will be sharing their favorites on their tumblr page.
[Disclosure: Haagen Daz sent over product samples and gifts in exchange for me blogging about their "Moment's for Me" campaign. All thoughts and opinions are my own]
Labels:
Moments For Me,
sponsor's
Tuesday, April 23, 2013
mother's day cards ...
Can you believe Mother's Day is Sunday May 12th?
It seems to always sneak up on me! I think Mother's Day is such a great holiday. I think being a Mother is one of the hardest jobs out there, and it's so neat to take a day to celebrate Mothers.
I am teaming up with Card Store to show you some well design Mother's Day cards that are easy to make, and can be sent right to your recipients door, or to you to hand deliver your loved one.
I love it because it has the convenience of an e-card, but Card Store will print it out, address it, and put US postage on it, and physically ship it out to your recipient or to you! I think giving real cards is such a great tradition that should live on!
I put together a card for my mom using the easy pre-designed cards, and I just added my photos, and customized it with my own special message to my mom.
I couldn't decide which one I liked best, so I did two!
Enjoy!
And, cheers to all you Mother's lovers out there!
[*Disclaimer: This is a sponsored post by Card Store. All thoughts and opinions are my own]
It seems to always sneak up on me! I think Mother's Day is such a great holiday. I think being a Mother is one of the hardest jobs out there, and it's so neat to take a day to celebrate Mothers.
I am teaming up with Card Store to show you some well design Mother's Day cards that are easy to make, and can be sent right to your recipients door, or to you to hand deliver your loved one.
I love it because it has the convenience of an e-card, but Card Store will print it out, address it, and put US postage on it, and physically ship it out to your recipient or to you! I think giving real cards is such a great tradition that should live on!
I put together a card for my mom using the easy pre-designed cards, and I just added my photos, and customized it with my own special message to my mom.
I couldn't decide which one I liked best, so I did two!
It was very easy to customize them with my photos, and write and sign a message inside the card!
I'm excited for her to receive them in the mail for Mother's Day!
Don't forget to create your special Mother's Day card, and use the promo code: CSF3199 to create Mother's Day cards for only $1.99! (expires May 5th)
My mom is a special lady! She is the most un-selfish person I know, always giving up her needs for others. I am sure that was a lot of sacrifice for her having six children, but I never heard her complain!
One of the many things my mom taught me was how to cook! My mom is an amazing cook, and I remember helping her in the kitchen since I was a little girl.
I wanted to share one of our family recipes that my mom taught me to make over the years, and we still eat at family gatherings. My mom is well-known for her wontons, and I want to share with you her steam wonton recipe today!
Steamed Wontons
Ingredients:
1 lb. ground beef, turkey, or pork
1 tablespoon soy sauce
1 teaspoon sugar
1 teaspoon fresh ground pepper
1/2 teaspoon of salt
1 tablespoon fresh ginger minced
3-4 cloves fresh garlic, minced
¼ cup chopped green onions
3-4 drops sesame oil
1 1/2 cups frozen peas & carrots
1 package of wonton skins, preferably round ones (gyoza/ potsticker skins)
Directions:
Combine all filling ingredients in a large bowl, mix well.
Bring water in steamer to a boil. Place 1 tablespoon of meat mixture in the middle of a wonton skin. For steamed wontons, squeeze the edges of the wonton skins towards the top, with some meat still exposed. Place wontons in steamer for about 10-15 minutes or until wonton skins are translucent and meat inside is cooked. Serve with dipping sauce.
Dipping Sauce
Whisk together:
1 tbs soy sauce
2 tsp rice vinegar
2 tbs brown sugar
1 clove garlic, minced
2 drops sesame oil
½ tsp fresh ginger, minced
½ tsp green onion, minced
1 ½ tsp water
red pepper flakes (optional)
Enjoy!
And, cheers to all you Mother's lovers out there!
[*Disclaimer: This is a sponsored post by Card Store. All thoughts and opinions are my own]
Labels:
recipes
Friday, April 19, 2013
DIY: dipped wooden cutlery ...
I love the custom look of "dipped" cutlery at a party or even a wedding!
I am sharing a full tutorial over on project wedding on how to customize your wooden cutlery for your next event by just painting it!
See the full post on project wedding DIY dipped wooden cutlery.
[all photos by me, Caroline Armelle Drake]
Subscribe to:
Posts (Atom)


