guest post: danyelle from dandee …

April 14, 2011

—————————————————————————————————————————
today’s guest post is from the talented danyelle from dandee designs.
danyelle blogs about the amazing parties she throws, her five children, and all things that inspire her.  she also has a darling etsy shop!  i just love her spring in a can!  danyelle and i were able to hang out while attending alt this year, and i’m so glad i was able to meet her.  such a sweet and talented gal!
thanks again danyelle for taking the time to guest post while i am away!
———————————————————————————————————————–

It’s that time of year again! Swimsuit season is upon us, friends. I have done some hunting and gathered up some of my favorite modest suits for me and my girls (ages 9 + 3). A splurge and a budget friendly option for all!

For me:
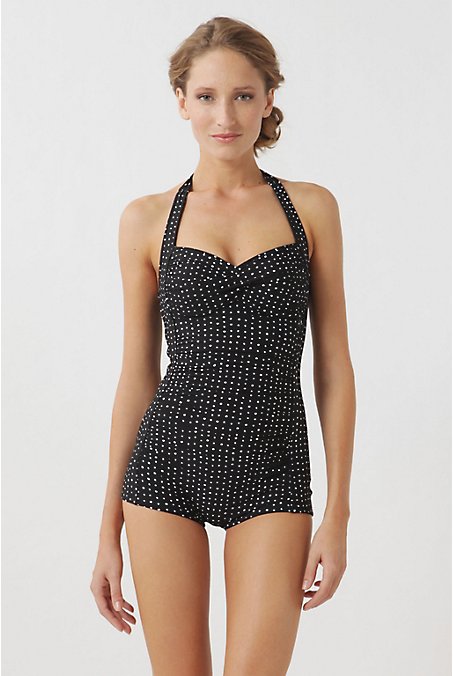
Splurge-I will never tire of the classic + flattering look of the Natalie One Piece from Anthropologie.

Budget- I love this red number by Jantzen available through Popina for a mere $60. The retro styling is similar to the ever popular Natalie from Anthro, but comes in at a fraction of the price.

For Abby (9 yrs.):
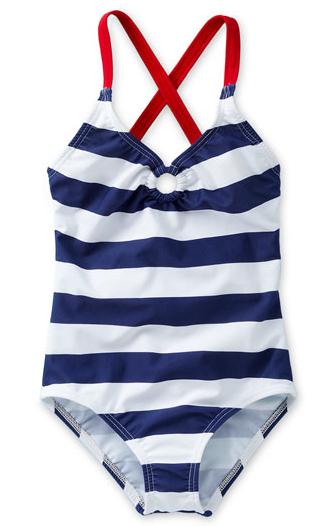
Splurge- I love the french feel and classic color combo of this suit by Mini Boden.

Budget- This color combination alone gets me, but add in the stripes and ruffle and I can’t resist. The $12.99 price tag doesn’t hurt either. Available right here at Target.

For Audrey (3 years):
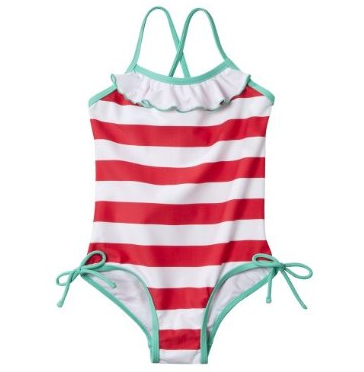
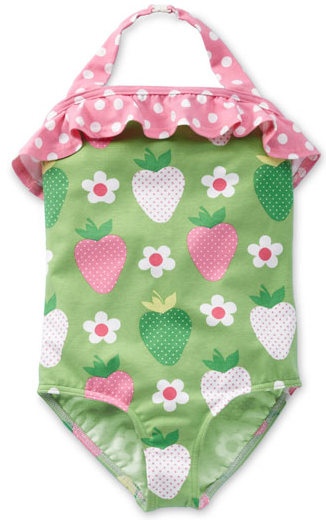
Splurge- A mini halter AND strawberries? I die. Mini Boden does it again.

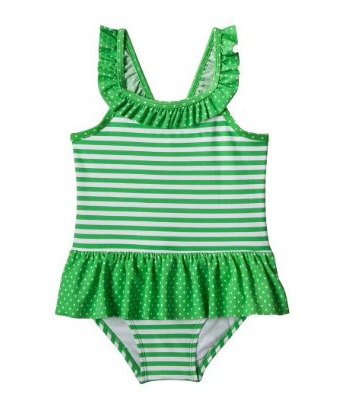
Budget- It’s hard for me to pass on anything in kelly green but add polka dots, and I’m toast. $10 at Target.

Thanks for having me, Caroline. And congrats on your sweet new mister.

guest post: melanie from you are my fave …

April 13, 2011

————————————————————————————————————————-
our next guest post is by melanie from you are my fave.
melanie has a lovely blog full of inspiration.  she blogs all her faves, along with her amazing parties, diy’s, and a lot of humor.  melanie is so much fun to be around, and i’m so glad that we’ve been able to hang out a few times and have loads of fun!  
today, melanie is sharing a great DIY on foil transfers.
thanks melanie for guest posting today while i’m off cuddling my little guy!
————————————————————————————————————————-

DIY Foil Transfer

Supplies:

– plain notebook (you could also use this for making your own cards or sprucing up an envelope) 
– double sided tape (I actually used glue squares that you would use for the back of photos)
– gold foil (or color of your choice)
– popsicle stick
– scissors

Cut out your design from the tape and adhere to the notebook. I stuck with a simple triangle cut out. Cover design with foil, matte side down, and press down firmly with the stick. Pull back the foil sheet for the finished product.

I’m definitely going to play around this more. My next project is to die cut letters from sticker sheets and foil monogram every plausible surface.

thanks melanie!

guest post: rachel from playing house …

April 12, 2011

———————————————————————————————————————–
our guest post today comes from rachel of playing house.
rachel has a lovely blog where she chronicles her beautiful life with her hubby and two girls, shares her recipes, favorite diy’s, and all things that inspire her!  head over to her blog if you want to have some feel good fun!
thanks again rachel for guest posting!
————————————————————————————————————————
First off, thank you Caroline for letting me share some love on your blog!
I am mildly obsessed with thrift stores and re-making old things. Today I want to share with you two easy/cheap/cute ways to take a men’s XL tee and turn it into something you might actually wear.
Here we go!…
SHIRT #1
 (I am AWFUL at taking pictures of myself, obviously, please forgive….and expect craaaazy faces)

1)TURN SHIRT INSIDE OUT. Take a shirt you already have and trace roughly, and pin.
2)Cut on your marked lines.

 3)Take you sleeve scraps, trace your hand (these will be your pockets), then cut (you’ll have four pocket pieces now)
4)Turn shirt right side out. Pin and sew one pocket piece onto one side of the shirt, for each one.

5)Turn inside out again, pin and sew from the armpit, around the pockets to the bottom.
 BLAM! A new, fitted, long, new-to-you t-shirt with pockets!
SHIRT #2

 1)TURN SHIRT INSIDE OUT. Trace a shirt that fits you already (or just eye-ball it), pin, cut (note we cut the neck bigger on this one), then just sew from the armpit down, and the shoulders.

2) Take your scraps and cut out the sleeves
3)Cut up the sleeve seam
4) Should look like this now
5) Pin and sew one side together
6) Trim off the big arch, so you just have a slight curve on top.
7) Looks like this now, one strip

8&9) with the shirt inside out still, pin and sew the neck on that sucker.
KA-POW! The custom cowl-neck shirt you’ve always wanted!
The great thing about working with jersey material like this is it is stretchy and doesn’t fray, so very, very forgiving. So don’t worry about hemming the sleeves or even sewing straight! Yay for easy!