guest post: heather from the coterie blog …

April 18, 2011

————————————————————————————————————————————–
our guest post today is from heather of the coterie blog.
heather blogs about her family life, her photography, and all the pretty things that inspire her.  she also has an etsy shop called kantan designs where she sells her darling prints.  today she is sharing a favorite recipe for old fashioned hamburgers, yum!
thanks heather for guest posting today! 
—————————————————————————————————————————————————————–


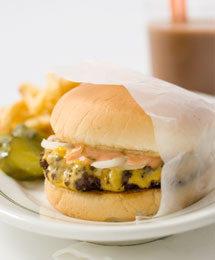
Best Old Fashioned Burgers
I LOVE hamburgers. They’re for sure in my top three favorite foods of all time.  I decided to try out this old fashioned hamburger recipe from America’s Test Kitchen. With only minor changes due to lack of certain ingredients, it was the best home made hamburger I’ve EVER HAD! I said it. I feel like a criminal changing an America’s Test Kitchen recipe, but you do what you have to do, right?

I’d like to compare it to a delicious diner burger, with that yummy special sauce on top. Maybe Stan’s? Make it for yourself and see. It was DELICIOUS! It was really simple to make, too!

Oh, and I served the burgers with homemade french fries as well.

*MY changes are in italics

Makes 2 burgers

I made a mini one for my son as well


Sirloin steak tips are also labeled “flap meat” by some butchers. Flank steak can be used in its place. This recipe yields juicy medium to medium-well burgers. It’s important to use very soft buns. If doubling the recipe, process the meat in three batches in step 2. Because the cooked burgers do not hold well, fry four burgers and serve them immediately before frying more. Or, cook them in two pans. Extra patties can be frozen for up to 2 weeks. Stack the patties, separated by parchment, and wrap them in three layers of plastic wrap. Thaw burgers in a single layer on a baking sheet at room temperature for 30 minutes before cooking.
I didn’t do any of this…just got out a pound of ground beef from the freezer and defrosted it

Burger
5 ounces sirloin steak tips, cut into 1-inch chunks
3 ounces boneless beef short ribs, cut into 1-inch chunks
I used just under a pound of regular ground beef
Kosher salt and ground black pepper
1 tablespoon unsalted butter
2 soft hamburger buns
1/2 teaspoon vegetable oil
2 slices American cheese
Thinly sliced onion for serving
Burger Sauce
Makes About 1/4 Cup

2 tablespoons mayonnaise
1 tablespoon ketchup
1/2 teaspoon sweet pickle relish (I omitted the relish..didn’t have any)

1/2 teaspoons sugar
1/2 teaspoon white vinegar
1/4 teaspoon ground black pepper
*Mix all sauce ingredients together. set aside.

1. Place beef chunks on baking sheet in single layer, leaving 1/2 inch of space around each chunk. Freeze meat until very firm and starting to harden around edges but still pliable, 15 to 25 minutes.

2. Place half of meat in food processor and pulse until meat is coarsely ground, 10 to 15 one-second pulses, stopping and redistributing meat around bowl as necessary to ensure beef is evenly ground. Transfer meat to baking sheet, overturing bowl and without directly touching meat. Repeat grinding with remaining meat. Spread meat over sheet and inspect carefully, discarding any long strands of gristle or large chunks of hard meat or fat.
Didn’t do #1 or #2…just defrosted ground beef in the microwave until just about defrosted, but still a tiny bit frozen, yet pliable.


3. Gently separate ground meat into 2 equal mounds. Without picking meat up, with your fingers gently shape each mound into loose patty 1/4 inch thick and 4 inches in diameter, leaving edges and surface ragged. Season top of each patty with salt and pepper. Using spatula, flip patties and season other side. Refrigerate while toasting buns.

4. Melt 1/2 tablespoon butter in heavy-bottomed 12-inch skillet over medium heat until foaming. Add bun tops, cut-wide down, and toast until light golden brown, about 2 minutes. Repeat with remaining butter and bun bottoms. Set buns aside and wipe out skillet with paper towels.

5. Return skillet to high heat; add oil and heat until just smoking. Using spatula, flip burgers over and cook for 1 minute. Top each patty with slice of cheese and continue to cook until cheese is melted, about 1 minute longer.

6. Transfer patties to bun bottoms and top with onion. Spread 2 teaspoons of burger sauce on each bun top. Cover burgers and serve immediately.

ENJOY!

guest post: rachelle from kenziepoo …

April 15, 2011

————————————————————————————————————————————–
today’s post is from rachelle of the popular blog kenziepoo.  rachelle’s blog was inspired by her darling little girl, and she blogs all about her amazing children inspired finds.  i especially love her outfit into room posts!  she is also the editor of a new online children’s magazine called, la petite.  be sure to visit rachelle over on her blog and her online magazine.
thanks again rachelle for taking the time to post on my blog!
—————————————————————————————————————————————-
Hi my name is Rachelle Francey. I am visiting today! I am of a blogger, mother and editor. I was inspired to start a blog called Kenziepoo, after my daughter Kenzie. I write on everything from clothes to nursery decor. I am also the editor of the online magazine for kids, La Petite. La Petite is releasing it’s 4th issue the first of May. I currently live in Boise, Idaho with my husband and daughter Kenzie.
Here is a sneak peek of La Petite issue 4, which will come out in a couple weeks! I am really excited about this issue and I hope you all like it too!
Photography taken by: First Photo: Monika Elena Second Photo: Emily Ulmer
I recently just took a few images of my daughter Kenzie. She will be turning 3 the end of April. It’s hard to believe how fast they grow up!
Here are a few photo’s of her being my little model!

Here are things that I am obsessing over as of Lately in Kids fashion! Anything Bobo Choses! You can probably tell that I am a big fan because of what Kenzie is wearing! You will love their clothes, and so well priced.
I had so much fun visiting-Rachelle

healthy choices …

April 14, 2011

Did you know that you could make microwave popcorn in a brown paper bag?
Well, I didn’t either until just recently.  I was thrilled to discover this as an option to make some quick and easy microwave popcorn!  The store bought microwave popcorn isn’t always the healthiest choice, plus there is now talk if microwave popcorn releasing harmful chemicals from the packaging.  Yikes, right?
I couldn’t believe how simple it was to make your own microwave popcorn!
All you need is: (adapted from this recipe)
  • a brown paper lunch bag (10 5/8″ x 5 1/8″ x 3 1/8″)
  • 1/4 cup un-popped popcorn kernels
  • 1 tsp olive oil
  • 1/4 tsp sea salt
  • scotch tape
place kernels into the brown paper bag.  fold the bag over twice and seal with tape.
place bag into microwave (can be on it’s side or up-right).  cook on high for 2-3 minutes or until the popcorn pops are 3-5 seconds in between pops.  Remove from microwave and shake before opening. Once popped*, open the bag and drizzle with olive oil and salt while shaking bag.
*you can also add the olive oil and salt to the kernels before before you pop them, just keep in mind that the oil can seep through the bag.  also, you can of course substitute butter for the oil, I like olive oil because it is a little bit healthier.
enjoy!
I also wanted to share a few other healthy ideas!
In our home, we really try to make good decisions regarding the food we choose to eat.
It has become even more important to me to make good food decisions since I have had my children.  I feel responsible to feed and nourish my children with the healthiest options possible.
One method I use to help our family choose healthier options is by reading the nutrition labels on any food that has packaging.  Ideally, we try to eat as many foods as possible that do not have labels, like fruits and vegetables, but when we do eat packaged foods, I try look very carefully at the label.
A few things I like to look at are:
  • Ingredients.  For me, less is more.  I try to purchase the items with the least amount of ingredients.  For the most part, that means it is less processed foods.
  • Sugar Content:  I also look at the amount of sugar.  Again, less is more there.
  • Calories:  it will vary depending on the item.  But, it is always good to be aware of the amount of calories that are in an item.
  • Protein:  For protein, usually more is good.  Protein in healthy items helps you feel full longer.
  • Sodium:  Many items these days are incredibly high in sodium.  Too much sodium can cause high blood pressure, so it is always good to be aware of your sodium intake.
  • Cholesterol:  If you tend to have high cholesterol, or even if you have good levels, it is always good to be aware of your cholesterol intake.
Choose this, not that:  For most products, there are many options.  Some options are much healthier than others, and if you just take a minute to read the labels before you make your decisions, you can be on your way to eating healthier in no time.  Here are a few items that we eat in our home all the time, and the healthier options I have found for them.
  • Peanut butter:  There are many brands and choices for a staple like peanut butter.  But, have you read the ingredients in some of these brands lately?  Or the sugar content for that matter?  I have recently started buying the organic peanut butter from costco.  Not necessarily because I buy into the whole organic thing.  I just like that the ingredients were simply, organic peanuts and salt.  And, it only had 2 grams of sugar.  You should have seen the ingredients on the skippy brand peanut butter we used to eat.  Too many and I couldn’t pronounce half of them.
  • Popcorn:  Did you know that popcorn is considered a healthy whole grain?  While popcorn alone is healthy, all the additives are not.  But, instead of the un-healthy microwave popcorn’s with a lot of butter and salt, you can always pop your own popcorn in the microwave using a brown paper sack, or air popped is great as well!
  • Crackers-  My children love crackers.  But, after looking at some of the ingredients in a lot of the popular kid crackers, I wasn’t really happy with that choice.  We choose to eat a lot of triscuits at our house.  I like them because the ingredients are simply: whole grain soft winter wheat, soybean oil, and salt.  It is hard to find crackers with only 3 ingredients these days.
  • Syrups-  I have avoided letting my children add any kind of syrup to their pancakes or waffles, but lately they have been asking for it more and more.  Instead of the high fructose corn syrup choices, the better choice if you have to have syrup is maple syrup.  It has only one ingredient, pure maple syrup.  I think it is clearly the better choice.
  • Fruit Snacks-  My children call fruit leather, fruit snacks.  Really, I am not sure why some of the “fruit snacks,” on the market are even called fruit snacks.  Really, they are just candy.  I love the fruit leather as a healthier option because it does in fact contain fruit!  I like the stretch island fruit co. fruit leather, and each strip has a 1/2 a serving of fruit and they don’t have added sugar or food coloring.
  • Yogurt-  Some of the yogurt choices out there are really interesting to me.  Really some are just a bunch of food coloring and sugar.  A healthier option would be to make your own yogurt, or I like to buy plain greek yogurt.  The ingredients in the greek yogurt I buy is, skim milk, and live and active cultures.  We like to add fruit or fruit preserves for different flavors.
So, I hope this has helped you to become more aware of how to make healthier choices.  I do try to make healthier choices, some times I am better than other times, but it is nice to know there are always healthier choices for many of the food items we eat in our home regularly.
So, what are your secrets to making healthier choices?